The Kerio WebMail environment
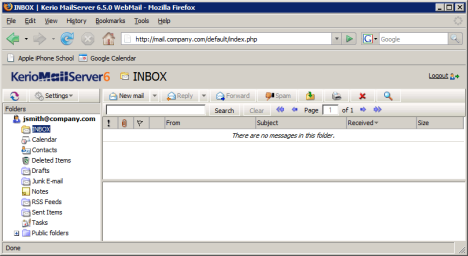
Once you are successfully connected to Kerio WebMail, a special user interface resembling of usual email clients is opened in the browser (see figure 1.7 The first connection to Kerio WebMail). Basically, Kerio WebMail consists of three functional parts:
- hierarchically sorted folder tree,
- the main pane with content of the selected folder,
- toolbar (depending on folder type),
This section addresses main Kerio WebMail components:
The left pane of the Kerio WebMail window provides the folder tree. The tree includes all folders of the mailbox. Clicking on any folder displays its contents in the main pane (message list, calendar, etc.).
The folder tree allows manipulation with individual folders. This means that folders can be moved, renamed, created and removed here. Folders and possible options are focused in chapter 1.11 Folder Administration.
In addition to the basic operations, in the folder tree it is also possible to add or remove access rights to users as well as subscribe folders of other users. Sharing and subscription of folders is addressed in section 1.11.5 Shared and public folders.
The main pane of Kerio WebMail displays contents of a folder currently selected in the folder tree. To view content of the folder in the main pane, click on the particular folder in the tree. The way of display in the main pane depends on folder type. Kerio WebMail supports viewing of the following folder types:
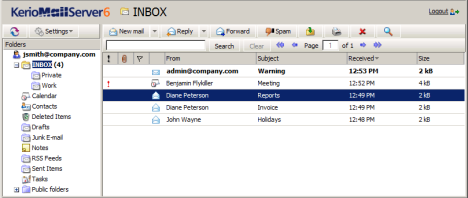
- EmailIn case of email folders, the main pane consists of three sections. These include a list of messages, a special reading pane where the message body is displayed and a toolbar where several email tools can be found (see figure 1.8 Email).
Email folders and their manipulation are addressed in chapter 1.6 Email.
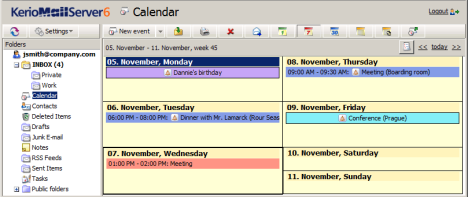
- CalendarThe layout of the calendar’s main pane depends on view mode. Figure 1.9 Calendar shows calendar in the weekly view mode. Beside this mode, day and month views are available, as well as two types of lists, distinguishing events with and without recurrence.
For detailed information on calendars, see chapter 1.8 Calendar.
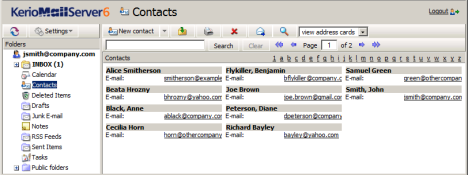
- ContactsLike calendars, contact folders also allow various view modes. The modes available for calendars are either address cards or a list of contacts (at figure 1.10 Contacts, the address cards mode is shown).
For detailed information on contacts and their management, see chapter 1.7 Contacts.
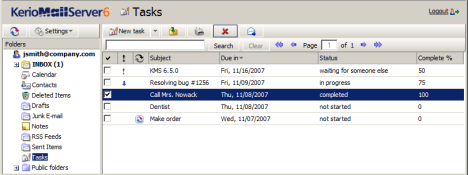
- TasksIn case of tasks, the main pane provides a list of created tasks and a toolbar allowing comfortable administration of tasks (see figure 1.11 Tasks).
For detailed information on tasks, see chapter 1.9 Tasks.
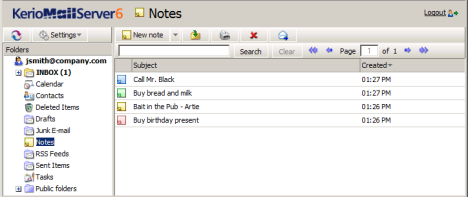
- NotesThe main pane of the Notes folder provides a list of notes (see figure 1.12 Notes). The notes use customizable colours to distinguish various topics. The main pane also includes a toolbar allowing creation of new notes, their removal, printing, etc.
For detailed information on notes, see chapter 1.10 Notes.
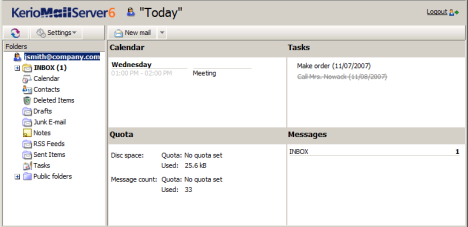
The “Today” page provides overview of the current status of the mailbox. It shows current number of unread messages in Inbox (Settings allow to add more folders for which this information will be shown) as well as tasks and events for the current day. It also includes a quota for disk space reserved for the particular mailbox (if the quota has been set by the server administrator). This section also provides information about current free and occupied space in the mailbox so the user can always easily recognize how much of the mailbox is currently available.
To open the “Today” page, click on the root folder (at figure 1.13 Today page, the root folder is wsmith@company.com).
In the user interface it is possible to set the “Today” page as an introductory page that would be displayed upon each connection to Kerio WebMail (for details on these settings, see chapter 1.12.1 User settings). Thus the users can see right at the start what should be done on that day and they do not have to surf through individual folders. Individual items at the “Today” page are formated as links which can be simply clicked to view the particular event, task or email folder.
The “Today” page is divided into four parts. The information in individual sections vary (events, tasks, quota and number of unread messages):
- Calendar — this section includes a list of events scheduled for the current day. In Kerio WebMail’s user settings, up to seven days may be set to be displayed at the “Today” page. For details on where and how number of days to be displayed can be set, see chapter 1.12.1 User settings.
- Tasks — by default, this section shows a list of tasks set for the current day. However, in the user interface it is possible to change the “Today” page settings so that all tasks included in the particular folder are always displayed. The settings are addressed in chapter 1.12.1 User settings.To make manipulation with tasks even more comfortable, various types of information are also displayed, such as priority (an exclamation mark or a blue arrow), information on uncompleted tasks where the due date has already expired (items marked red), etc. These attributes are shown at figure 1.13 Today page.
- Quota — server administrators can set a so-called quota and apply it to particular mailboxes. The quota is a limit for number of messages and for diskspace reserved for the mailbox. The Quota section informs users if quota is set and how much of the reserved mailbox capacity is left. When the mailbox is full, the server generates an automatic message recommending to remove some messages in the mailbox and sends it to the corresponding user. If the user ignores this warning, other mail will not be delivered to the mailbox since no more capacity is left.
- Messages — by default, this section shows all unread email in Inbox. In the Kerio WebMail user settings, it is possible to allow also displaying of other email folders. Details on where and how these settings can be done are addressed in chapter 1.12.1 User settings.
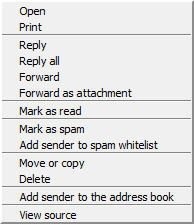
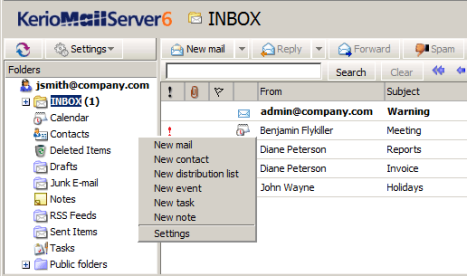
The Kerio WebMail’s pop-up context menu, opened by right-clicking on an object (folder, message, note, etc.), provides a list of actions. The pop-up menu is always associated with a particular object. This implies that right-clicking on an email message opens a menu (this menu is shown at figure 1.14 Context menu for email) which includes options different from the options included the pop-up menu associated with the Tasks folder (opened by right-clicking on Tasks in the folder tree).
The Kerio WebMail’s pop-up context menu generally includes the same items as found on toolbars of individual folders.
Note:
- If a new contact, event, task or another item is created through the pop-up context menu (see figure 1.15 The pop-up menu for creation of a new item (message, contact, event, etc.)), these items are added automatically in the default folders (Contacts, Calendar, Tasks). Default folders are folders included in Kerio WebMail by the moment where the particular account is created (such as Inbox) and they cannot be removed.
- On Apple Macintosh computers, click the mouse button and hold the Ctrl key to simulate the right mouse button behavior. On the standard two-button mouse, the right mouse button shows the context menu.
Kerio WebMail allows moving and copying of items between folders. Variety of methods can be used for this purpose and it depends on the user’s choice which one they feel more comfortable with. The methods are described in the following section:
The Drag & Drop method is a simple way how to move and copy an item by using the left mouse button:
- Put the mouse pointer over the item to be moved. Hold the left mouse button and drag the item over the destination folder. Release the mouse button.Note: To copy the selected item(s), hold the
Ctrlkey (orAlton Mac OS X). - Hold down the mouse button (and the
Ctrlkey, when copying) and drag the item to another folder. - A green tick icon appears when the item is ready to move (see figure 1.16 Moving items by the Drag & Drop method) or a blue
+icon when ready for copying (see figure 1.17 Copying items by the Drag & Drop method). - Let hold of the button to move the item to the selected folder immediately.
Note: Unless the item is dragged over a folder where it can be moved (i.e. any mail folder with corresponding access rights in the folder tree), a red icon is displayed meaning it is impossible to move the item to the particular location.
The toolbar includes a clickable Move or copy icon. Items can be move or copied by using this button as described below:
- Highlight the selected item and use the button in the toolbar.
- In the Folder selection dialog just opened, select the folder where you want to move or copy the item and click on or .
Filed under: Support | Tagged: email, kerio, mail, webmail |




Leave a comment